Wednesday, August 8, 2012

DIY: S'mores Kits

After the bride and groom make their happy departure, let the guests mingle and roast marshmallows. If your venue does not have firepits, you could also use little gas camp stoves on every table.


Materials:
1. Hershey's Chocolate Bars
2. Graham Crackers
3. Marshmallows
4. Wire Hangers
5. Cellophane Bags in 3 Sizes
6. Adhesive Paper and Cardstock
7. Labels and Instructions design (downloadable pdfs right here and here.)
8. Kraft Box with Lid 4.75" x 6" x 2.5"
9. Tissue
10. Ribbon
11. Scissors
12. Wire Cutter


STEP 1: Remove the marshmallows, chocolate and graham crackers from their original packaging and put them in cellophane bags. Here we put six graham cracker squares in a 4" x 6" bag, Three chocolate squares in a 5" x  3" bag, and about 10 marshmallows in a 5.5" x 8" bag.


STEP 2: With the wire cutters, cut off the head of the hanger and then bend the hanger in fourths so it fits the length of the box. Secure it with ribbon.


STEP 3: Print out the labels on adhesive paper and instructions on cardstock and cut them out. Fold up the instructions.

STEP 4: Lining the box with a piece of tissue, assemble the marshmallows, crackers, chocolate, instructions and hanger in the box.


STEP 5: Adhere the label to the box lid and voila! A S'mores Kit!


DIY: S'mores Kits - Project Wedding

Wednesday, August 1, 2012

2012 Wedding Trends: Metallic Gold

Metallic gold is showing up everywhere this year, from high-fashion to home decor and especially in weddings. Metallic gold is one of the most glamorous and elegant colors you can add to your wedding to make it an event to remember! This dazzling metallic isn’t just for traditional or formal weddings — it also works perfectly to add a feel of romance to vintage inspired weddings, and an unexpected flare to modern and contemporary weddings.


2012 wedding trends: metallic gold | Letterpress wedding invitation inspiration | Bella Figura

Wednesday, July 25, 2012

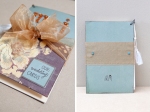
DIY: Wedding Card Album


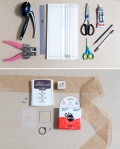
Supplies You’ll Need:
  1. Two pieces of cardboard
  2. Three pieces of patterned paper that all complement each other
  3. Ink pad
  4. Glue dots
  5. 30″ of ribbon
  6. Two large brads
  7. Large ring
Step 1: Prep The Front And Back Covers
You’ll need two pieces of cardboard to make the mini-album. The size of your album will depend on the largest card in your stack. Measure about a quarter of an inch past each side of your largest card. Trace your measurement and cut two pieces – one for the front and and one for the back.
Step 2: Design Your Front And Back Covers
Choose something meaningful to put on the cover. A wedding picture, the date, your initials…
Then you’ll need three pieces of patterned paper that all complement each other. Based on the design you choose for the front of your album, measure and cut your desired papers.
Step 3: Create The Wraparound Bow
This part can be tricky, but it’s important to get it right. The ribbon will hold your entire album together.
You will need about 30″ of your desired ribbon. You want the bow to tie directly over the line of your two patterned papers on the front of your album. Put a mark about one inch in from each side – this is where you will attach the ribbon.
Placing the ribbon over your marks, stab through the ribbon with scissors
Once your holes are ready, put two large brads through the ribbon and cardboard and secure them on the backside. Now your ribbon is completely attached.
Step 4: Prepare The Interior Album Covers
Next, cover the inside of your album covers. Trace your cardboard and cut out your choice of paper, attach with glue dots.
IMPORTANT: You must do this step after the ribbon is attached, so that the paper covers the brads that poke through the backside of your album.
Step 5: Add Embellishments
Add alphabet initials, stamps, or any other details to jazz up your cover.
Step 6: Affix The Album Ring To Tie It All Together
Draw a little dot where you want to punch your hole, about half an inch in from each side. Place your album covers together, insert into your hole punch.
Next, stack your cards together and in sets of four to five, punch the same type holes. Now you will need a large spiral ring, which you can purchase at a scrapbooking store. Open it up, insert your album cover, then all of your cards, and then finally your back cover!

Monday, July 16, 2012

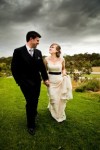
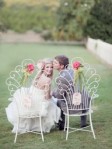
25 Tips How to look Fabulous in Your Wedding Photos


25 Tips from the people who know best – the photographers.
20829216996111046_2p2TZCTP_b20829216996168208_MB7SB4cc_b90353536244014580_QVNWHZSn_b
1. Be Yourself. Don’t try to look or be anything other than yourself. If you are self-conscious about a certain thing and it manifests itself physically, it will ultimately come through in the photography … Be your best self and you can ensure that the photos will indeed portray you as your best self.
2. Relax. Were often our worst critics when it comes to pictures. Remember that you want to be seen the way others see you too. While you want flattering photos, you want to make sure that it still looks like you in the pictures.
3. Laugh! It’s flattering on everyone.
4. Think about the moment. Capturing the romance of the day, the emotion, excitement & intimacy is what it’s all about. Don’t look at your photographer, look at your new spouse and savour it all. Your photographs will be amazing & true.
5. Forget the camera is there and try your best to be playful and warm.
6. Have an engagement session. This is so valuable for client and photographer. The clients have an opportunity to relax and be in front of the camera and the photographer can get to know his or her clients. By the time I am at the wedding we are friends and this makes everyone more relaxed!
Get the Look
7. Practice in the mirror! Study your face and figure out the best smile (or maybe you like your serious face better) and angle for you.
8. Be comfortable. For engagement and portrait shoots, wear clothing that is flattering, but comfortable too! If your 6 inch stilettos are hurting your feet, it will show in your face!
9. Keep makeup and eyelashes normal and classic.
10. Mind the lens. Try to not allow one part of your body to be closer to the lens because it will make that part appear larger than the rest of your body.
11. Get in position. To make your neck look more elongated, drop your shoulders and raise your chin. Imagine that you are being pulled by a string from the top of your head.
12. Be prepared. If you are prone to have flyaway’s or random frizzies in your hair, have a toothbrush with hairspray on standby! One squirt and swoop will tame most frizzies and help your hair look super smooth for pictures.
13. Have white chalk handy. White chalk hides stains on wedding gowns. If you are worried about grass stains, general dirt or in case there is a spill on your wedding day, make sure to have some on hand! It works in a jiffy and no one will know but you!
14. Dab. If you are planning on getting married in the summer and want outdoor photos, oil dabbing strips are a MUST HAVE! Make sure the groom has a hanky too. Sweaty photos are not pretty!
Strike a pose
15. Not head on. To look thinner, keep your shoulder to the camera and avoid facing the camera straight on. Hide behind the groom a bit or tuck into his armpit to slim yourself down.
16. Don’t look down. To avoid a double chin, have the photographer shoot from above the eye/face level. Tilt the head a bit sideways to hide the chin and have the photographer avoid shooting from the side. (I also remove as much of the double chin as possible in editing with Photoshop.)
17. Hand on hip. Every girl feels insecure about her bare arms in a strapless dress. The remedy? Instead of the arm laying flat against the torso and making it look wider, simply toss the hand on the hip. It will make the arm much more toned looking.
18. Angle yourself. Balance your weight on your back foot and cross the other foot in front of the other in a T fashion. Pop a hip towards the camera but at an angle. This is universally appealing and slimming, especially when
combined with hands on the hips.
19. Natural light is your friend! Getting ready in a room with windows makes for great pictures. Not only is the light beautiful, it is also flattering and makes your skin look amazing. Opening the shades whenever you can will add a lot to the pictures in any situation.
20. Make sure your reception is well-lit. The best wedding receptions seen in magazines have lighting covering the dance floor and on the cakes and table arrangements. Consider hiring a lighting company to light your reception or ask the venue/band/DJ to light your reception for you. The pictures will be amazing and you won’t regret it!
21. Don’t let it get TOO dark during dancing. DJs and bands love a dark dance floor to entice people to get loose. Photographers, of course, want this too and want to get fun dance shots of the crowd, but we need a little light to focus on people. Ask the venue ahead of time not to turn off the lights entirely. Also, during your first dance, have spotlights! Will and Lauren Aves, Aves Photographic Design
22. Use spotlights. If you are planning a candlelight ceremony, be sure to have a spotlight shining on the area where you will be saying your vows.
23. Prevent the squinty look. If the sun is really bright, close your eyes and ask your photographer to let you know when s/he is going to take the picture. Open them when s/he tells you and that will eliminate the ’squinty’ look. This also works if you typically wear glasses and do not want to wear them for portraits.
24. Love yourself. After photographing hundreds of brides I can tell you that every single bride is beautiful on this day, regardless if they consider themselves plain, overweight etc. The transformation is always astounding. Accept it, believe it and be confident the camera will see it.
25. Be happy. Happiness is beauty!

Tuesday, April 3, 2012

Bridal Trends, Occasions Bethel


Access Hollywood
updated 3/29/2012 3:33:06 PM ET
Angelina’s leg bomb dominated the Oscars, but who knew the leggy look would end up being a huge trend in the bridal world?! Dan Rentillo, design director for David’s Bridal, reveals the top five celebrity-inspired looks and how brides can add some Hollywood glamour to their big day!
A little bit of leg “From the Golden Globes to the Oscars, stars including Charlize Theron and Angelina Jolie were seen wearing gowns with sultry, thigh-baring slits. This high fashion look is now being seen in bridal and translates perfectly for the bride that is a little daring, but wants to remain sophisticated and glamorous on her wedding day. A favorite style secret of mine: by showing a flash of leg, a woman’s silhouette is elongated, making her look slimmer and taller, which is always on trend.”
AdChoices
Tea-length skirts “Tea-length skirts offer a retro feeling for spring and summer brides who want a leggy look that can still be seen as formal. Emma Stone wore this look by Alexander McQueen earlier this year to the Screen Actors Guild Awards. The key to correctly wearing this trend is to make sure that the skirt hem hits at the calf or shin, as you never want to go too short.”
Sheer necklines “This spring, we have also seen a lot of bridal gowns with sheer necklines or what is called Illusion necklines with appliqued lace. This look is delicate and feminine for the bride that isn’t quite comfortable wearing a strapless gown, but wants to show off some skin. By using a sheer fabric on the neckline of a dress, it strikes a balance between sultry and sophisticated. We first saw this on Kate Middleton’s wedding gown, and the look can be flattering on any bride-to-be.”
Soft skirt drama “Kristen Wiig for her Oscar debut was just one of the many stars this season to showcase the trend of soft skirt drama. Light and ethereal, the softly textured skirt looks chic and easy for any spring bride. The dropped waist on the dress can give a slim bride’s frame some curves, while the soft feather-like details in the skirt add a romantic touch.”
Sculpted one shoulder “The sculpted one shouldered look is modern, architectural and completely on trend with what starlets are wearing on the red carpet from movie premieres to the Oscars. It works for almost all body types, as the dress draws attention to the bustline and upper body, and can be seen in many dress styles from A-line to a classic princess-cut. Brides can wear this dress with a simple updo and pretty jewels or flowers in their hair to complete the look.”